Написать скрипт (JavaScript) и играть в Пинг-Понг (Pong) онлайн
В игру Пинг-Понг (Pong) на Ява скрипт (JavaScript) теперь можно играть онлайн бесплатно!
Теперь можно самостоятельно написать и код и сделать свою собственную игру.
Возможность создавать интерактивные игры на JavaScript становится все легче благодаря постоянным улучшениям движков JavaScript и возможности использования графического процессора в браузерах. Чтобы продемонстрировать, как легко писать игры на JavaScript, мы собираемся написать игру Пинг-понг.
Чтобы написать нашу игру, мы будем использовать чистый JavaScript и элемент canvas для рендеринга игры.
Давайте создадим очень простую HTML-страницу:
<html>

  <head>

    <script src="pong.js"></script>

  </head>

  <body></body>

</html>
Мы начинаем наш файл pong.js, получая правильный requestAnimationFrame вызов:
var animate = window.requestAnimationFrame ||

  window.webkitRequestAnimationFrame ||

  window.mozRequestAnimationFrame ||

  function(callback) { window.setTimeout(callback, 1000/60) };
Этот requestAnimationFrame
method очень полезен. Это работает так же, как setTimeout в том, что он будет call your callback со скоростью примерно 60 вызовов в секунду (read: 60fps). Что делает это лучше, чем просто использование setTimeout так это то, что ваш браузер может выполнять оптимизацию the call. Например, если вкладка не активна, она прекратит making calls, пока не станет снова активной.
Для того, чтобы выполнить рендеринг, нам нужно настроить canvas и захватить grab его 2d context:
var canvas = document.createElement('canvas');

var width = 400;

var height = 600;

canvas.width = width;

canvas.height = height;

var context = canvas.getContext('2d');
Теперь, когда страница загрузится, мы прикрепим canvas к экрану и call a step
function используя наш animate method:
window.onload = function() {

  document.body.appendChild(canvas);

  animate(step);

};
The step function будет нести ответственность за выполнение трех вещей. Сначала он обновит все наши objects: the player’s paddle, the computer’s paddle, and the ball. Далее он сделает render этих objects. И, наконец, он будет использовать requestAnimationFrame to call the step function снова:
var step = function() {

  update();

  render();

  animate(step);

};
Чтобы получить что-то на экране, давайте реализуем update as a no-op and for our
render function мы установим фон нашей игры to #6FA883 используя
fillStyle
and
fillRect
methods provided by the context:
var update = function() {

};


var render = function() {

  context.fillStyle = "#6FA883";

  context.fillRect(0, 0, width, height);

};
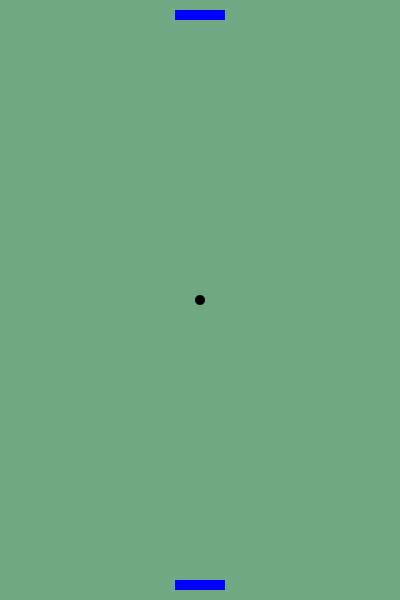
Когда мы загрузим нашу страницу, мы должны увидеть что-то вроде этого:

Добавление Лопаток Paddles и Мячика the Ball
Давайте добавим наш objects so we can render them to the screen. Мы создадим наш paddle and give it an x,y position, a width and height, and both an x and a y speed (который мы будем использовать позже).
function Paddle(x, y, width, height) {

  this.x = x;

  this.y = y;

  this.width = width;

  this.height = height;

  this.x_speed = 0;

  this.y_speed = 0;

}


Paddle.prototype.render = function() {

  context.fillStyle = "#0000FF";

  context.fillRect(this.x, this.y, this.width, this.height);

};
Так как каждый paddle будет контролироваться независимо, один игроком и один компьютером AI, давайте создадим objects to represent them. The x and y coordinates are chosen поставить игрока внизу (the canvas’s coordinate system’s origin is in the upper left hand corner) и компьютер наверху.
function Player() {

   this.paddle = new Paddle(175, 580, 50, 10);

}


function Computer() {

  this.paddle = new Paddle(175, 10, 50, 10);

}
Когда мы render будь то игрока или компьютер, мы просто render their paddles (в будущем мы могли бы расширить это до render their scores также):
Player.prototype.render = function() {

  this.paddle.render();

};


Computer.prototype.render = function() {

  this.paddle.render();

};
Последний объект, который нам нужно создать, the ball. Since the ball will be a circle, the x,y coordinates will represent the center of the circle and we’ll give it a radius of 5:
function Ball(x, y) {

  this.x = x;

  this.y = y;

  this.x_speed = 0;

  this.y_speed = 3;

  this.radius = 5;

}


Ball.prototype.render = function() {

  context.beginPath();

  context.arc(this.x, this.y, this.radius, 2 * Math.PI, false);

  context.fillStyle = "#000000";

  context.fill();

};
Now we’ll build our objects and update our render function:
var player = new Player();

var computer = new Computer();

var ball = new Ball(200, 300);


var render = function() {

  context.fillStyle = "#6FA883";

  context.fillRect(0, 0, width, height);

  player.render();

  computer.render();

  ball.render();

};
Когда мы перезагрузим страницу, мы должны увидеть это:
Оживление
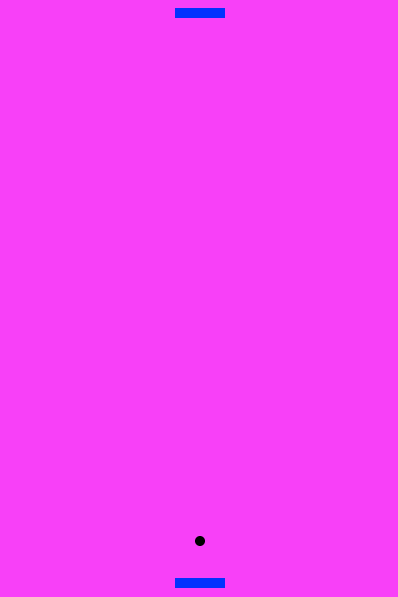
Давайте начнем добавлять движение. Мы оживим the ball чтобы он направился к paddle игрока. Мы сделаем это by changing the update from a no-op and adding an update method to the ball:
var update = function() {

  ball.update();

};


Ball.prototype.update = function() {

  this.x += this.x_speed;

  this.y += this.y_speed;

};
В результате шарик должен двигаться вниз:
Since the paddles are stationary мы можем сделать the ball bounce back and forth between them by modifying our update and check to see if the ball hits the left and right hand sides or the top and bottom. Нам также нужно будет to pass both of the paddles into the update method:
var update = function() {

  ball.update(player.paddle, computer.paddle);

};


Ball.prototype.update = function(paddle1, paddle2) {

  this.x += this.x_speed;

  this.y += this.y_speed;

  var top_x = this.x - 5;

  var top_y = this.y - 5;

  var bottom_x = this.x + 5;

  var bottom_y = this.y + 5;


  if(this.x - 5 < 0) { // hitting the left wall

    this.x = 5;

    this.x_speed = -this.x_speed;

  } else if(this.x + 5 > 400) { // hitting the right wall

    this.x = 395;

    this.x_speed = -this.x_speed;

  }


  if(this.y < 0 || this.y > 600) { // a point was scored

    this.x_speed = 0;

    this.y_speed = 3;

    this.x = 200;

    this.y = 300;

  }


  if(top_y > 300) {

    if(top_y < (paddle1.y + paddle1.height) && bottom_y > paddle1.y && top_x < (paddle1.x + paddle1.width) && bottom_x > paddle1.x) {

      // hit the player's paddle

      this.y_speed = -3;

      this.x_speed += (paddle1.x_speed / 2);

      this.y += this.y_speed;

    }

  } else {

    if(top_y < (paddle2.y + paddle2.height) && bottom_y > paddle2.y && top_x < (paddle2.x + paddle2.width) && bottom_x > paddle2.x) {

      // hit the computer's paddle

      this.y_speed = 3;

      this.x_speed += (paddle2.x_speed / 2);

      this.y += this.y_speed;

    }

  }

};
The collision detection happening here is pretty standard Axis Aligned Bounding Boxes or AABBs. You’ll notice in the code that if the paddle is moving when it hits the ball, the x_speed is added to the ball. Это заставит его двигаться быстрее или медленнее в зависимости от the direction of the ball and the direction of the paddle.
Контроли Controls
Теперь мы собираемся добавить in controls so that the player can update the position of their paddle, we’ll do this by adding a keysDown object to keep track of which key is pressed:
var keysDown = {};


window.addEventListener("keydown", function(event) {

  keysDown[event.keyCode] = true;

});


window.addEventListener("keyup", function(event) {

  delete keysDown[event.keyCode];

});
The update method of the player can now update the position of its paddle depending on which key was pressed:
var update = function() {

  player.update();

  ball.update(player.paddle, computer.paddle);

};


Player.prototype.update = function() {

  for(var key in keysDown) {

    var value = Number(key);

    if(value == 37) { // left arrow

      this.paddle.move(-4, 0);

    } else if (value == 39) { // right arrow

      this.paddle.move(4, 0);

    } else {

      this.paddle.move(0, 0);

    }

  }

};


Paddle.prototype.move = function(x, y) {

  this.x += x;

  this.y += y;

  this.x_speed = x;

  this.y_speed = y;

  if(this.x < 0) { // all the way to the left

    this.x = 0;

    this.x_speed = 0;

  } else if (this.x + this.width > 400) { // all the way to the right

    this.x = 400 - this.width;

    this.x_speed = 0;

  }

}
Компьютер Computer AI
Now we can control our paddle and the ball will bounce around accordingly; however, the computer is not very good at the game yet so we’ll need to add a very simple AI. For this project the computer will just try its best to position itself according to the center of the ball. We’ll give the computer player a max speed so that we can occasionally score a point. We’ll need to alter the main update function as well as update the computer player:
var update = function() {

  player.update();

  computer.update(ball);

  ball.update(player.paddle, computer.paddle);

};


Computer.prototype.update = function(ball) {

  var x_pos = ball.x;

  var diff = -((this.paddle.x + (this.paddle.width / 2)) - x_pos);

  if(diff < 0 && diff < -4) { // max speed left

    diff = -5;

  } else if(diff > 0 && diff > 4) { // max speed right

    diff = 5;

  }

  this.paddle.move(diff, 0);

  if(this.paddle.x < 0) {

    this.paddle.x = 0;

  } else if (this.paddle.x + this.paddle.width > 400) {

    this.paddle.x = 400 - this.paddle.width;

  }

};
И мы это сделали! У нас есть рабочая игра Пинг-понг.
Поскольку браузеры становятся все более мощными, игры в Интернете без Adobe Flash будут быстро расти. Возможно, JavaScript сможет позиционировать себя как один из самых доступных и легко изучаемых языков для создания игр.
Для начала игры пожалуйста перейдите по этой ссылке, шарик автоматически начнёт прыгать.

Вы можете играть в игру Pong пока только на компьютерах, на мобильных устройствах Анна не успела сделать.